Tuesday, December 26, 2006

Christmas Catch Up

Merry Christmas to all who have visited r/c sublog this past year!

It's been neat to monitor the visitor activity and it occurs to me that many of you have been dropping by and coming away empty. Was August really the last time I posted progress? Rest assured I've been working on the boat -- just haven't had time to post.

The bottleneck is the images. If I were only writing about the work that would be one thing. But if you can't see pictures it really isn't all that fun to follow is it? And the extra steps to shoot good images, download them, work them up in PhotoShop, and stick them in with the text is what has slowed things down. Nevertheless, I'm going to try to get back up to speed shortly.

So, hang in there and I'll get the images together for a series of posts: my final solution for side keel fastening; ready made rivets; phosphoric atomizer installation; rudder rack and pinion components; dive plane bearings; and more.
Continue Reading

Sunday, August 27, 2006

FIll in the Blanks

As the stock side keels supplied with the CR66 Nautilus kit were the parts created for the static version, a little further modification was in order. The static side keel came with planes molded in. A flat backing strip on the hull side behind the planes was molded into the part as well to correspond to a slot in the hull. To use the thicker r/c planes, the static planes needed to be removed and the back strip cut out. Without the back strip, which didn't fit into the hull slot well at all, the slot needed to be filled.

Work began with masking the slot with 3M painter's tape. This product is low tack, yet forms a good seal. This kept excess filler from fouling the hull's rivet detail.


A course grit sanding stick was then used to scuff up the slot to promote adhesion of the filler. These sticks are a great way to get in the many nooks and crannies of the Nautilus -- places a sanding block, or paper, can't go. The dust was blown out to make sure the slot was clean.


The filler used was a new product (to me): Evercoat Metal Glaze. It is a quick drying automotive grade filler recommended by Dave Merriman of subpirates.com. I tracked down a quart kit at a Sherwin Williams automotive paint store.


The two part filler was mixed in small batches and poured into each slot. When using Evercoat, mix small amounts at a time as the the product catalyzes quickly. My very first batch hardened in mid pour. I had to scrape off the material on the boat. The mixing directions on the product are vague. I reduced the catalyst in successive batches and the material worked fine. Experiment with small amounts before applying it to a model. A little bit of catalyst goes a long way.


The cured filler proved to be extremely hard, yet very workable. Adhesion was excellent. A drill bit from the inside of the hull opened up the hole for the dive plane shaft bearing. Pealing off the tape yielded crisp edges on the filled areas.


A metal file and sanding block were used to take the filled areas down flush to the hull seams. 3M tape went over the rivet heads during this process to prevent damage. The result was a nice filled hull panel requiring minimal spot puttying for a perfectly smooth finish. Once the shaft bearing is permenantly installed, I will touch this up and hit it with primer.
Continue Reading

Monday, August 07, 2006

Spare the Rod, Spoil the Planes

While prepping my side keel parts for installation, I noticed the thin strips surrounding the diving planes were rather fragile. Having spent some time outside under shade while on static display at local events, they also had a tendency to lose shape due to the heat. In order to prevent breaking one or more of the parts, and to help them retain shape in the field, I decided to reinforce them.


The first step was to remove them from their temporary installation on the hull and place them on the bench (sorry about the busy newspaper background). Using a Dremel and a small round grinding bit, I ground a channel in the resin along the inside (stern plane side) of the opening. Care was taken to ensure the channel stayed centered on the part and the groove didn't penetrate to the bench.


The channel was extended past the thin section itself, into the larger areas on each side, to tie them both together. Carbon fiber rod (.40" diameter) was cut to length as the reinforcing material. Carbon fiber is light, incredibly strong, yet pliable enough to "give" just the right amount in the event of an impact. Best of all, it retains its shape well and will keep the part straight under field conditions.


With the rod in the channel, it was secured with a few drops of thin CA catalyzed with Zip Kicker. Then, baking soda was used to fill in around the channel. Thin CA was added to the Baking Soda, instantly catalyzing it into a hard plastic-like material filling the channel. Some minor filing and sanding returned the part to its original condition albeit greatly strengthened internally. Both halves of each side keel part now true up with each other when placed on the boat. A quick fix (1 hour) that should pay off for a long time.

Continue Reading

Saturday, August 05, 2006

SubRegatta 06

Spent last weekend in Carmel, Indiana attending SubRegatta 06, the big annual meeting of The SubCommittee. There were close to 100 r/c submarines on display -- a modeler's paradise. The real thrill was getting to meet fellow members who I've talked to, exchanged emails with, or read about in The SubCommittee Report, our quarterly magazine. They were great guys to a man.

I took both of my 1/96 scale SSNs -- there just wasn't room for Nautilus. I figured there'd be several other Nautilus examples to look at but to my surprise there were none. A good reason to get busy and have mine finished for next year!

It's interesting -- the more I see the work of really skilled modelers like the stuff on display at Carmel, the more "freed up" I get to go in the garage and start bashing some stuff together to see what I can come up with. In between finishing up two Type XXI kits for shipment this week I broke down and ordered some brass rack and pinion pieces to start Nautilus' encapsulated rudder linkage.

Hats off to SubRon6 and the Indy Admirals for the incredible show they put together. The venue, the hotel, everything was first rate. We had a great time and came home inspired to build!

Continue Reading

Thursday, May 25, 2006

Sailing Away

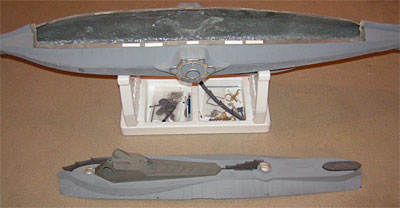
Although it isn't Nautilus related, I did get a chance to work on one of my subs lately. Hopefully the techniques described will help someone on their next project. The boat in question, a 1/96 ThorDesign improved Los Angeles class boat, was my first successful r/c sub project. Every year I do a little bit more to it. Last year it was dry transfers prior to our annual SubRon5 gathering in Georgetown. This year several of us plan to make the trip to Carmel, Indiana for SubRegatta 2006. As a result I got a little more ambitious in my upgrades: running lights, weathering, etc.

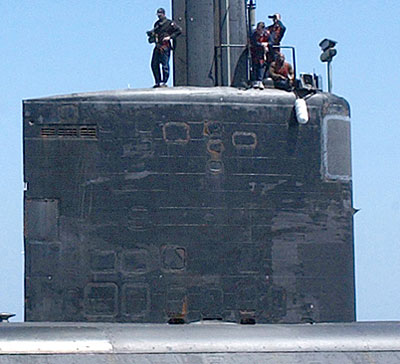
While prepping for the anticipated work, I studied countless pictures of Los Angeles class boats. One feature that couldn't be avoided in 1:1 scale was their anechoic tiling. This hull tratment consists of rubber tiles glued to the hull, usually in a brick pattern, and gives the sail and hull a rough, spongy look. Several threads on sub modleing boards have discussed different methods of how to duplicate the look. I've been told by others it can't be done effectively in a scale as small as 1/96. Nevertheless, I decided to stretch my modeling skills and see if I couldn't apply this distinctive look to my boat.

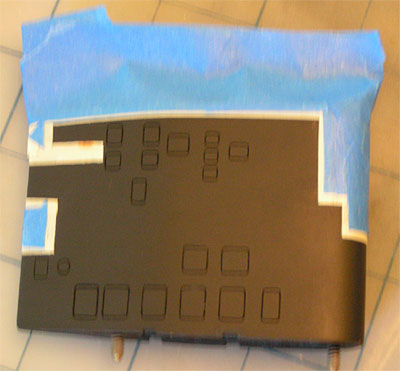
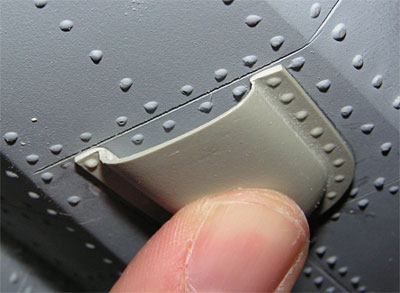
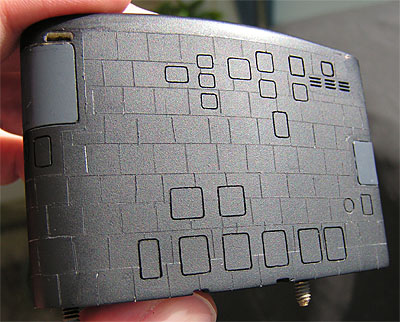
The sail became my test project. It is small and if my plans didn't work out, I could easily touch it back up to the way it was before. By studying real LA sails I noticed that the tiles aren't a uniform covering over the entire sail but rather are cut out around different parts such as diesel exhausts, sonar windows and trailing antenna flushing tubes. By paying attention to several photos (downloaded from the NavSource Online submarine photo index) I carefully masked off my sail to cover all areas that would not receive the tiling. As no two boats have the exact same patterm of tiles I felt no pressure to get it "perfect" (sorry about the burred image).

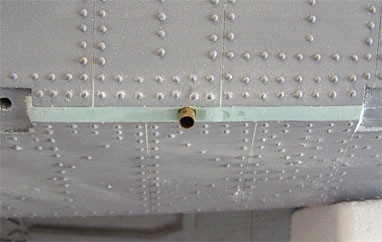
I then applied approximately 5 coats of flat black to the masked areas. I allowed them to surface dry quickly in direct sunlight between coats. Attention was paid to make sure paint was built up along the masked edges. This was where the thickness of the tiles would be visible.

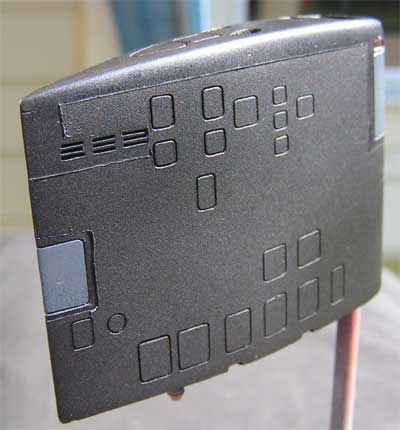
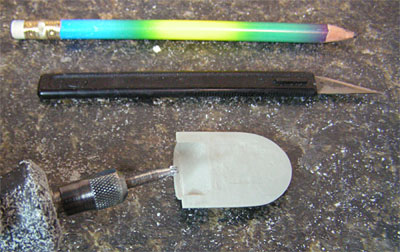
With the tape removed, the thicker layers of paint created a slight relief defining the tiled area. The edge was knocked down with a light wet sanding of 2000 grit. At this point I was pretty pleased with the results. Special note goes to Steve Neill and Kevin McCleod -- I learned this trick by reading their prospective scratchbuilding threads.

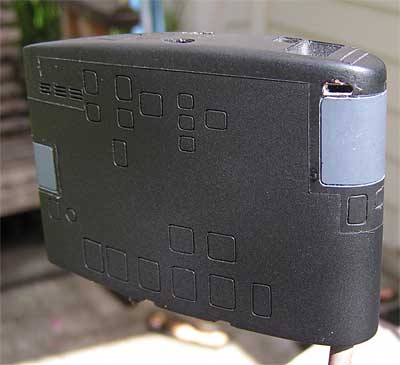
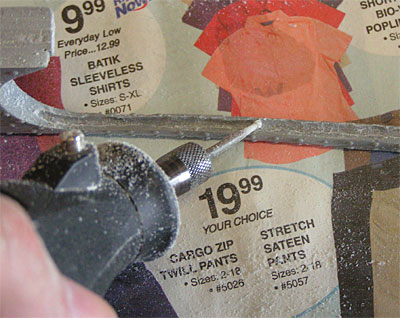
I was pretty thrilled by the initial results. The extra layer was visible without looking out of scale. But I was only half way there. I had to simulate the tiles themselves. Having considered recommended paint masks, etc. I decided to give the old tried and true method, scribing, a try to see if the effect would produce the results I was looking for.

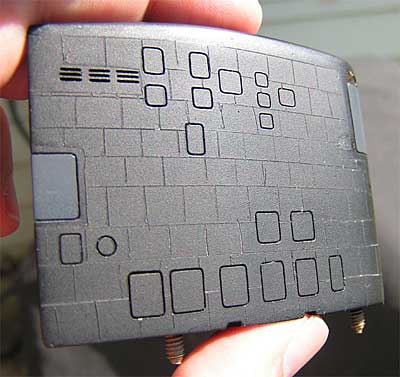
Using a plastic straight edge and scriber, I first laid down the horizontal lines on each side of the sail. Each line was made with a single light pass of the scriber. Care was taken to start a slight bit in from the paint edge. My goal was to suggest the tiles rather than define them like the access hatches and sonar window edges. With both sides done I carefully worked the lines around the curved leading edge of the sail.

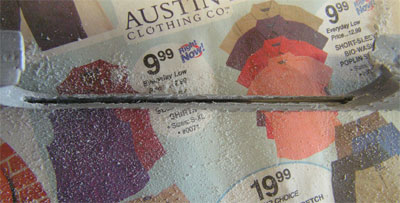
The vertical lines were scribed individually in a staggered brick pattern to follow the originals. Spacing was generally kept uniform but since the tiles are custom cut in many places to fit the real boats, I again felt free to improvise. A little paint weathering will tend to hide mistakes and further soften the scribed lines.

Overall, I am extremely pleased with the look. From a distance, one has to catch the model with the right light and angle to see the detail -- just like the real boats. But up close it is easy to see and gives it a unique texture. With my courage up I've decided to apply the same techniques to the hull next using a jig and surface marking tool to hold the scriber. I'll post the results when I'm done.
Continue Reading

Saturday, April 22, 2006

The Mightiest Movie Of All

Things are slowly returning to normal around the house and thoughts are beginning to include models. Stopping by disneysub.com recently, I saw a post which caught my eye regarding first time viewings of Disney's "20,000 Leagues Under the Sea." As it made a significant impact on my life, and directly relates to this blog, I thought I'd post an enhanced version of what I added to the disneysub thread.

Like a sea monster emerging from the fog, I remember the Oak Village Theater in Houston, Texas. My mom took me and my younger sister to the 1971 re-release. I was eight at the time. 20K was the first movie I saw in a "real theater" and not the drive-in. Below is an image of the clipping Ty Bumgardner kept from his first viewing in 1971.


The Oak Village Theater was one of those huge old movie houses. It only had two screens but they were built to handle all the widescreen spectacles. The screens had actual stages underneath. There were also large balcony sections. My sister and I sat on homemade wooden booster boxes my dad made for us.

I don't recall any advanced notion of what the movie was about. But I vividly remember the opening titles with the curtains pulling back -- which I thought was neat since the theater had large curtains across the screen which pulled back before the movie started. By the time the trombones started blasting, and the glowing monster began to charge across the waves towards the SS Golden Arrow, I was hooked.

I'll also never forget the part where Farragut asked Carson why he wasn't firing and Carson replied, "She's showing us her heels, sir!" I had no idea what that meant. I asked my mom, and though I can't recall her explanation, it did satisfy me. She also had to explain the large sucker-marks on the face of the crewman who slid down the stairs from the deck during the squid fight scene.

The salon was the most magnificent place I'd ever seen. When Nemo opened the iris for the first time I gasped. Quite a shock to see his open eyes staring in bloody death in the final reel.

The movie didn't make much of an impression on my sister. But I begged my mom to ask the ticket booth if they had an extra poster so I could hang it in my room. They said they only had the ones on display. They offered to give me one of them when the run was finished. Unfortunately, when we did check back they had already been thrown away.

With nothing but the vivid images in my head, that familiar craving for more took over. To my suprise, my older cousin had the 20K Big Golden Book. Thankfully, he let me borrow it. The book satisfied (partially) my budding addiction to the Nautilus. And after many, many readings by parents, sitters, and myself, it still sits on my bookshelf. I hope he doesn't want it back any time soon!

Continue Reading

Friday, March 10, 2006

Stop All Engines!

Just a note for those looking for progress: I've been caring for my wife during her recent surgery. All modeling on hold, of course. However, I have been writing. You can learn more at http://www.caringbridge.org/visit/juliecrozier.
Continue Reading

Friday, March 03, 2006

Side Keel Collars

A visitor, and fellow CR Nautilus r/c builder, recently asked me to clarify how I used wheel collars to secure the side keels. As this rather grainy image shows, the brass pins protrude into the hull and the wheel collar is slipped on and tightened with a set screw. In theory, this technique could be used to make the side keel removeable. However, I would thread the pins and use a washer and lock nut to hold it tight. Probably add a few extra pins too.


A note to regular visitors: I've added an email link on the side menu if you have any questions for me.
Continue Reading

Wednesday, February 22, 2006

Plane Talk

The diving planes supplied with the kit are clean and solid with crisp rivet detail. On the static version, the diving planes are molded into the side keels and are a tad thinner in cross-section.

The two large planes forward and aft have brass control shafts installed in them. The shafts have machined grooves which hold rubber o-rings (removed from the shaft in the photo). They come fitted in a brass stuffing tube filled with grease for mounting in the hull (shown on the shaft at right).


Since the stuffing tube would only work if it was mounted flush with the hull, I can only assume they were intended for a dry hull application. However, since mine will be a wet hull, and each plane will be mounted in a simple bearing in the hull, the stuffing tubes are unnecessary. Each set of forward and bow planes will be linked to a single pushrod exiting the WTC through a watertight seal.

The two small forward "trim" planes come without shafts and will be drilled out to accept a length of brass rod.
Continue Reading

Wednesday, February 15, 2006

En Guard

Without following any real plan other than wanting to see how it looked, and having already test fit the stern side keels, I drilled out a few holes and test fit the white metal prop guard parts.


These are really beefy parts and fit together quite nicely with minimal filing to remove flash. They are very heavy, however. Weight on the extreme ends of an r/c sub means additional foam during trimming and can reduce performance. I may cast a replacement set in resin, reinforced with carbon fiber.

Inspired by the look, I fit together the upper rudder fin and the rudder next.


All that's missing is the five bladed hammerhead prop. The kit supplies a cast resin piece but I hope to use a cast aluminum prop being worked up for Andy Lawrence. The master was made from a CAD file provided by Will Babbington based on the master for the prop used on the 11' hero.

A word about bungees -- these work great in holding things together. I've used a lot of tape and clothespins to hold parts in the past, but these really work well with the hull shape.
Continue Reading

Tuesday, February 07, 2006

Better Late Than Never

Since I started this blog in the middle of act one as far as the project goes, here's a little background on the overall kit. It is manufactured by Jim Key's company, Custom Replicas, in Los Angeles, CA (see links for their website). At the time I purchased it, there were two options available, static or r/c. This blog is concerned with the r/c version.

The scale is 1/32. When it arrived, much work was already completed. The two hull halves were joined, a hatch was cut in the upper half, and eight hold down screws were installed to secure it. Below is the lower hull with access hatch removed. This allows for servicing of the internal watertight compartments, removal of batteries, etc. Note the white metal and resin fittings in place on the upper deck.


Here is a detail shot of the forward hatch seam. The two dark spots in the corners are the holes for the pan head screws.


The closed salon window iris is one cast resin piece and came installed in the hull. The cast metal window bezel is one piece as well and came with mounting screws installed. Vacuformed clear plastic windows are supplied for the salon and wheelhouse. The surrounding lights will be illuminated with LEDs.


Below are the assorted cast resin and white metal goodies. The large beams are supports for the display stand. Complete detail parts are included to depict all the external fittings and wheelhouse interior of the boat. The display stand is a kit unto itself. The black dot things that look like wiggly eyes -- are wiggly eyes. The clear lenses just happen to be perfect fits for the external salon lights. Just cut the backs off and voila!


Larger resin parts: side keels, ram, raker arch, white metal MBT grates, resin wheelhouse deck, and display stand crossbeam.


The Custom Replicas "movie" Nautilus is a big model with a big price tag. But it comes with an enormous amount of stuff -- not to mention the prefabrication. Given my available time, I figure I've saved five years over trying to scratch build this boat. The end result will undoubtedly be better looking too.

Custom Replicas does include a CD with solid, illustrated instructions and reference photos. However, it is referenced for a static kit build-up. One is on their own in regards to finishing out the boat for r/c operations. That I can handle.
Continue Reading

Sunday, February 05, 2006

Scoop Redux

The two larger, flat scoops on either side of the bow near the keel were reworked next. While they were cast with a recessed area to depict the inlet, it is pretty shallow. The part also has a flange across the bottom of the opening, and a rather thick riveted flange surrounding the part, which I wished to modify. To begin, I cut away the flange across the hull side of the scoop opening. Then I ground out the scoop area with a Dremel, like I did with the smaller scoops, to produce a more pronounced recess.


I then used the belt sander to shave down the back side of the piece where it contacts the hull to give the flange a thinner profile.


Here you can see the reworked scoop in comparison to the stock scoop. The inlet is now much more concave.


This profile view contrasts the thickness of the flange area before and after.


Next, I placed the part in position on the hull and traced around it. A thin knife blade was used to shave off the rivet heads where the scoop touches the hull. I was careful to leave untouched the rivets which can be seen inside the scoop.


The finished part in position. The additional depth, and especially the second row of rivets in the scoop area, are really pleasing to the eye. To me, it looks more funtional this way.


Will opening up these parts increase the parasitic drag on the boat while underway? Sure. But I'm not building it for high performance submerged runs. My operational goals, based on the movie, can best be described as "stately". And, like with most model boats, I'll probably spend more time looking at it than actually driving it.
Continue Reading

Saturday, February 04, 2006

Dorsal Morsel

The kit's dorsal fin is a single cast urethane piece. Very crisp and detailed, it has the forward vertical bar that runs to the end of the wheelhouse breather flap housing. This piece was not on the 11' hero. However, it was on the deck set so I will use it. To me, the deck set has priority since that's where the actors stood onscreen (I defer to the hero on the aft diamond shaped deck grate. The deck set was 4' too short and featured only the forward half of the grate -- go figure).

The kit's instructions describe inserting tubes in the deck to capture brass rods inserted into the bottom of the dorsal fin. Friction would hold it in place. I want more security while underway, but still want to be able to remove the part during transport. So, I drilled two holes in the deck and filed them out slightly. I then drilled two corresponding holes in the bottom of the fin and inserted two lengths of threaded stainless steel. These were made by cutting the heads off two bolts and filing down the cut edges. These were CA'd in place.


The fin is held in place by two nuts on the bolts. The result is a flush and sturdy fit.


The only detail the fin lacks is the latch in the tip that held the hatch in the open position. To be fair, the hero did not have this feature. But the deck set did, and it can occasionally be seen onscreen, so I'm not quite done with it...
Continue Reading

Thursday, February 02, 2006

Fit To Be Glued

The CR Nautilus kit comes with the upper and lower hull halves bonded together and an access hatch cut in the upper hull. The resin and white metal detail pieces are numerous, detailed and complete. With a little drilling and filing a large portion of the boat can be pieced together.

One of the biggest impacts to be made visually is to add the side keels. They come in four cast urethane pieces with brass mounting pins molded into the parts. Following a quick session with an electric drill to open up the hull to receive the pins, the side keels were fit in place. Small wheel collars where slipped onto the pins on the inside of the hull and snugged down to hold the parts in place (aided by rubber bands and small bungees on occasion).


While the aft side keels fit snugly against the hull with minimal filing, the forward side keels were a bit rough -- especially forward where they curve with the hull towards the ram. Unwittingly, I stumbled upon an easy way to improve the fit: solar power.


With the side keels held in place by wheel collars, I snugged the forward sections against the hull using rubber bands tightly wrapped around the bow. The boat was then left outside in the shade on a hot day (actually serving as a static work-in-progress display at an AMA event). Upon disassembly after the event it was found that the temperature had softened the urethane enough for it to mold itself to the hull's shape. The new form was retained after the parts cooled down. Much easier than trying to do the same with a heat gun!


It also serves as a caution against rough handling of the boat in the future during extended periods at the pond in warm conditions.
Continue Reading

Wednesday, February 01, 2006

The Hole Story

To modify the Custom Replicas Nautilus for r/c, I had to open up the hull for quick flooding and draining. This will be a wet hull type boat meaning the interior is free flooding. The electronics will be housed in a watertight cylinder to keep them dry. The advantage of wet hull engineering is it reduces the overall weight of the finished model. The internal volume of dry hull boats provide huge amounts of positive bouyancy and thus need to be ballasted down with much more weight than wet hull boats.

The first step is to open up the main ballast tank floods. I attacked the job armed with a Dremel tool, sanding drum bit and particle mask. The nice thing about this particular chore is it doesn't require a lot of finesse.


Next, the upper hatches were opened up. This allows air to escape the hull during diving. Trapped bubbles can cause a boat to hang on a dive or throw off submerged trim. Therefore, they must be given a straightforward path to escape.


The forward hatch is also opened up. I worked from below on this one. Eventually the deck grates will be opened up as well.


A look inside the hull. All the MBT floods are open along with the diver access hatch. CR makes a stout hull and 1/32 scale provides ample elbow room to work on the WTC installation.

Continue Reading

Tuesday, January 31, 2006

The Scoop On My Scoops

Here's a little extra step I did on the scoops on my CR Nautilus: The four small rounded scoops are cast in solid resin for the kit. The scoop opening is solid as shown here:


To add more character to the scoop I took a round Dremel grinding bit and hollowed out the scoop around the intake.


Below, the reworked scoop on the model. A neat boost in visual impact with little additional effort.

Continue Reading
 

About Me

The first movie I saw in a theater was Disney's "20,000 Leagues Under the Sea" (1971 re-release). The first grown-up book I read was "War Fish" by George Grider. Built hundreds of plastic kits growing up. Saw an article on The SubCommittee in the mid 90's and joined. Began first foray into radio controlled subs in 1998.

Current Projects

1/32 scale Disney Nautilus (Custom Replicas kit).
1/96 scale USS Helena (SSN-725) (ThorDesign kit).
1/72 scale USS Permit-class (HMK kit)

Completed Boats

1/96 scale Permit-class modeled as USS Thresher (SSN-593).
1/96 scale Los Angeles-class modeled as USS Jefferson City (SSN-759).

R/C Sublog Copyright © 2010 | Community is Designed by Bie Blogger Template